Inventor add-in
The Autodesk Inventor add-in makes a model dimension and a worksheet variable the same number. A parameter in the part — a length, a diameter, a constraint, a feature dimension — is bound to a named assignment on a Calculeaf sheet. Change the model and the sheet recomputes. Change the sheet and the model follows. The add-in is free, runs on Windows 64-bit, and supports Inventor 2025, 2026, and 2027. You need a Calculeaf account.
Install it from the Autodesk Marketplace (search for Calculeaf, then Get). After install, Inventor shows a Calculeaf tab with Calculeaf and Parameters.
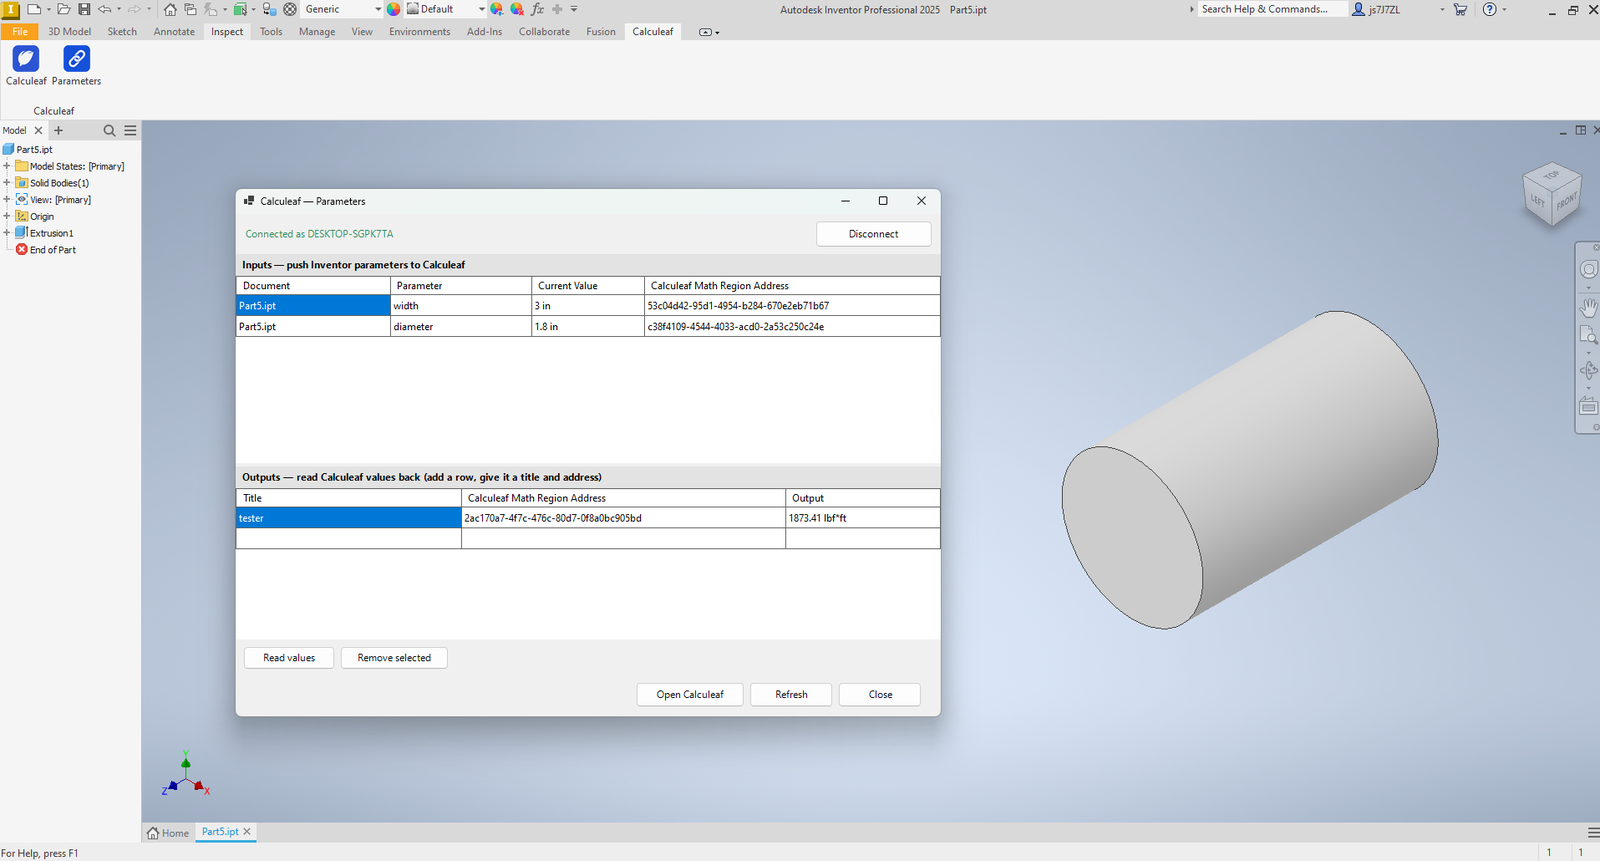
Connect the add-in
- Open a part in Inventor and choose Calculeaf on the ribbon, then Parameters (or Calculeaf to sign in first).
- The add-in opens a browser window. Sign in or create an account, then choose Authorize. The consent page spells out what you are granting: permission to read your worksheets and calculation values, and to update math region values through the API.
- Back in the dialog, Connected as shows your machine name. Disconnect there revokes access immediately; you can also revoke it later under Account settings → Connected Applications. Either way, reconnect from the add-in.
Only one computer can be connected at a time, so authorising a new machine disconnects the previous one. Other Calculeaf apps on that same computer stay connected.
Copy a variable address
Every link in the dialog is an address pointing at one saved math assignment. Build the calculation first and get its addresses out of Calculeaf, in the browser or the desktop app:
- Sign in and save the worksheet.
- Right-click a math assignment (
:=) and choose Copy variable address. - Paste that address into the add-in's Inputs or Outputs table.
Inputs — Inventor into Calculeaf
The Inputs table is labelled push Inventor parameters to Calculeaf. Each row pairs one model parameter with one assignment on the sheet:
| Column | What it holds |
|---|---|
| Document | The part file, for example Part5.ipt. |
| Parameter | The Inventor parameter name — width, diameter, and so on. |
| Current Value | The live value and unit read from the model, for example 3 in. |
| Calculeaf Math Region Address | The address you pasted, identifying the assignment that receives the value. |
On refresh, Inventor writes those values into the linked assignments and
the worksheet re-evaluates, so everything downstream of them is current.
Because the target is an assignment, it has to be a plain numeric input
such as w := 3 in. A line that computes something from
other variables has no number to overwrite.
Outputs — Calculeaf into Inventor
The Outputs table is labelled
read Calculeaf values back. Add a row, give it a title, and
paste the address of the answer you want. Inventor shows the current
value and unit, for example 1873.41 lbf*ft. This is the
direction to use for a reaction, a required thickness, or any other
calculated quantity that should drive the model.
- Read values pulls the latest answers from the sheet.
- Remove selected drops a row from the table.
- Open Calculeaf jumps to the web editor.
- Refresh reloads the connection and the values.
- Close dismisses the dialog.
A typical loop
- Build the calculation in Calculeaf, with a named assignment for each dimension you care about.
- Connect the add-in and open Parameters.
- Map Inventor parameters to those assignments under Inputs.
- Map result assignments under Outputs if the model should follow a calculated size or load.
- Change a value on either side, then Refresh or Read values so the other side catches up.
Units travel with the number in both directions, so keep the sheet's unit system consistent with the part — SI or USCS — and you will not be converting by hand.
Nothing about the add-in is Inventor-specific underneath: the same addresses work over plain HTTP, which is how you would drive a sheet from a script instead. See API tokens, and Region context menu for the rest of what right-clicking a region offers.
Walkthrough videos and the installer live on the Calculeaf Autodesk Marketplace listing. When reporting an install, account, or parameter problem, include your Inventor version, the add-in version if you know it, and any error text.